Anaes · Vaporisers
Vaporisers
Also known as Vaporiser · Plenum vaporiser · Variable-bypass · Draw-over vaporiser · Desflurane vaporiser · Temperature compensation
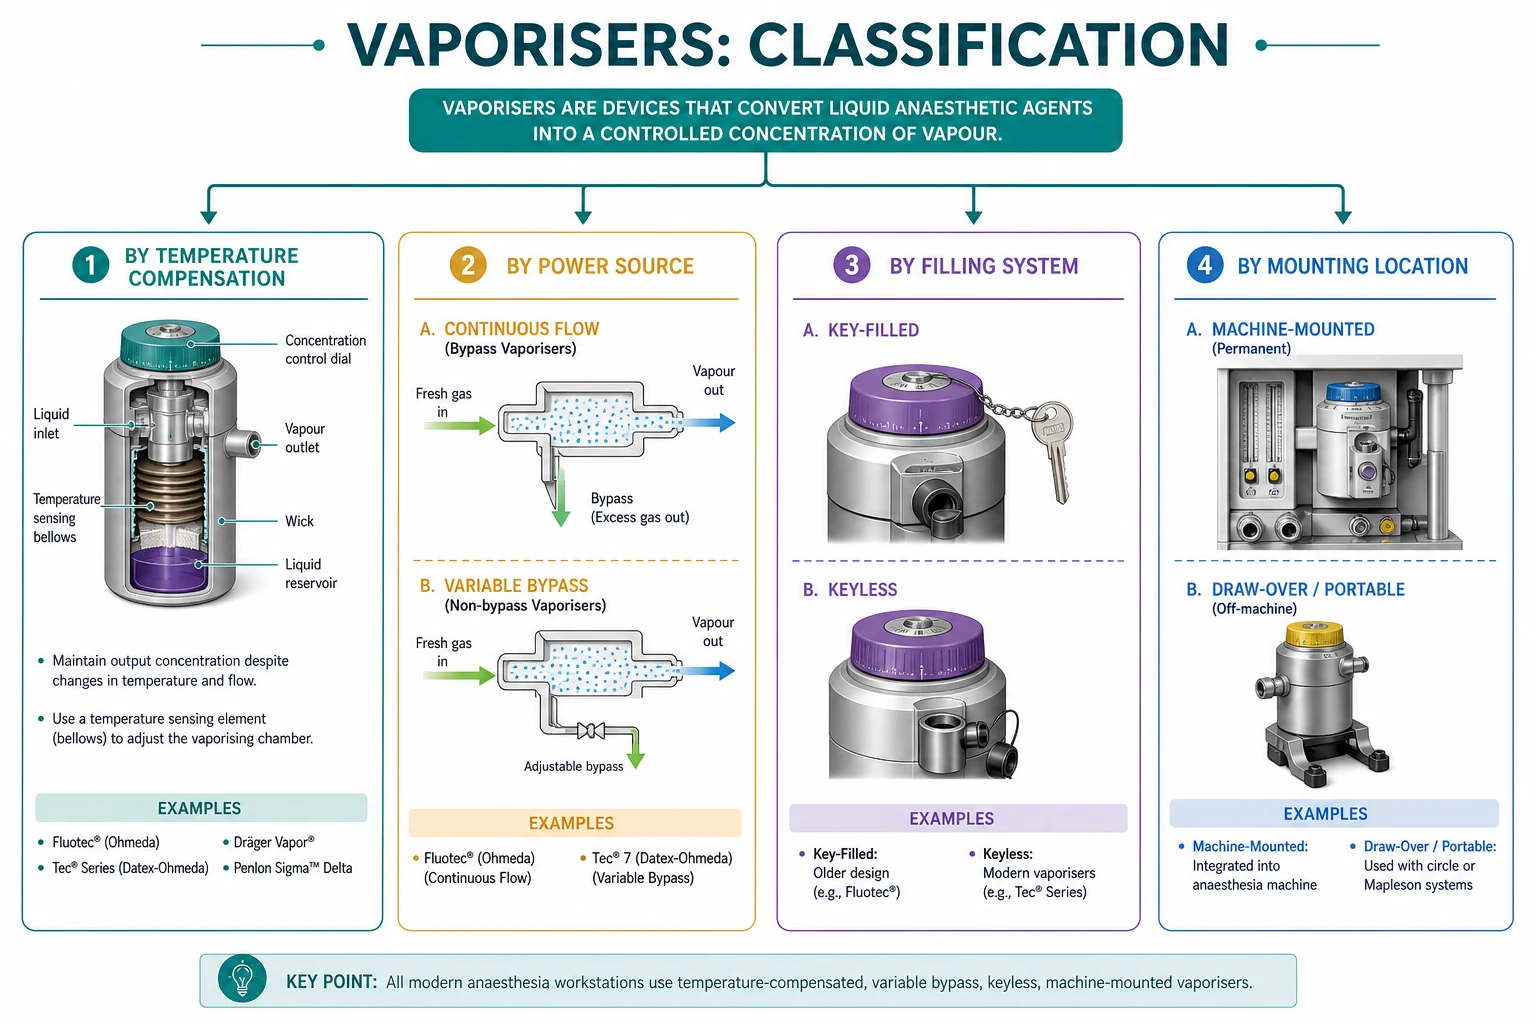
The vaporiser vaporises the liquid volatile anaesthetic agent and adds a precise concentration to the fresh gas flow. The framework rests on four exam-critical ideas: the variable-bypass plenum vaporiser (the standard for sevoflurane and isoflurane — a fraction of the gas is saturated in the chamber and diluted by the bypass); the temperature compensation (the bimetallic strip or the bellows compensates for the cooling of the vaporisation); the desflurane exception (its near-atmospheric saturated vapour pressure demands a heated, pressurised vaporiser); and the safety systems (the agent-specific filling, the interlock, the flow-resistance). Built on the AAGBI checking guidelines (2012), the anaesthetic machine assessment (Tiviraj 2016), and the closed-circuit review (Parthasarathy 2013).
On this page & tools
Your progress
Saved locally on this device.
Target exams
Red flags

Why this matters
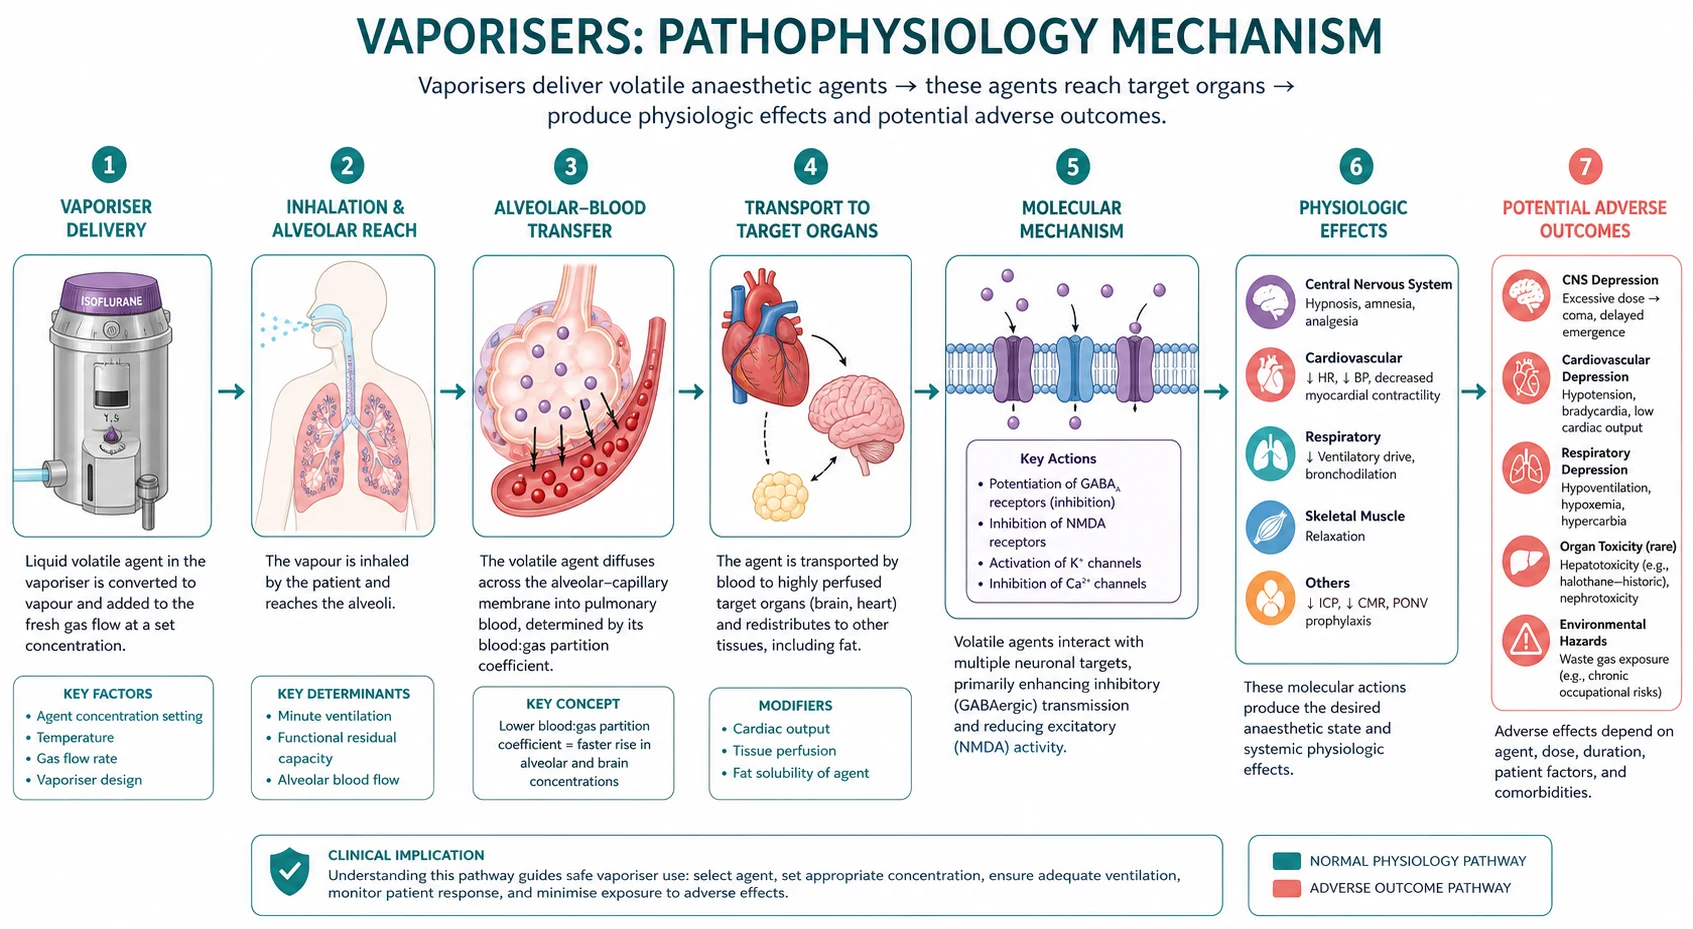
If the vaporiser is wrong, the patient is too deep, too light, or receiving the wrong agent. Primary equipment exams live here [1][2].
Variable-bypass plenum principle
Fresh gas splits into: [1]
- Bypass flow — no agent
- Chamber flow — fully saturated with agent vapour at the prevailing SVP [2]
Streams reunite. Dial position changes the splitting ratio (fraction through chamber). Plenum vaporisers are pressurised by upstream flowmeters and present resistance — accurate across usual FGF rates when upright and filled correctly. [3]
Saturated vapour pressure table (20 °C order)
| Agent | SVP ~20 °C | Boiling point | Vaporiser type |
|---|---|---|---|
| Sevoflurane | ~157 mmHg (21 kPa) | ~59 °C | Variable-bypass |
| Isoflurane | ~238 mmHg (32 kPa) | ~49 °C | Variable-bypass |
| Halothane | ~243 mmHg | ~50 °C | Variable-bypass |
| Desflurane | ~669 mmHg (89 kPa) | 22.8 °C | Heated, pressurised special |
Saturated chamber gas would contain (SVP/atmospheric) × 100% agent if undiluted — for desflurane that is ~90%, far above clinical 6–12%, and boiling risks uncontrolled output in a standard bypass design. [2]
Temperature compensation
Vaporisation is endothermic → liquid cools → SVP falls → output would fall. Compensation: [3]
- Bimetallic strip in bypass narrows bypass when cold → more chamber flow
- Aneroid bellows liquid expansion devices similarly adjust
- Thermal mass / wicks maintain saturation [1]
Specify output stability within clinical temperature bands (teaching often ±15% of dialled across 15–35 °C). [2]
Safety features
| Feature | Purpose |
|---|---|
| Agent-specific calibration | SVP and splitting differ by agent |
| Keyed fillers (colour/geometry) | Prevent wrong liquid in wrong vaporiser |
| Interlock on back bar | Only one vaporiser open |
| Anti-spill / level windows | Avoid overfill and tipping hazards |
| Downstream placement | After flowmeters, before common gas outlet |
| Selectatec / interlocking mounting | Mechanical interlock compatibility |
Desflurane vaporiser (Tec 6 type principles)
| Feature | Why |
|---|---|
| Heated to ~39 °C | Raise SVP / control boiling |
| Pressurised chamber | Controlled pure vapour injects into FGF |
| Electronics / alarms | Power failure ceases output safely |
| Not a simple variable-bypass | Because room-temp physics are hostile |
Draw-over vaporisers
Low resistance, often not temperature/flow compensated to the same degree, used with self-inflating bag / bellows in field anaesthesia (e.g. Oxford Miniature Vaporiser concepts). Output varies more with FGF and temperature — operator skill matters. [2]
Altitude note
Variable-bypass vaporisers deliver roughly constant partial pressure output with altitude changes more than constant volume percent in some analyses — exams may ask whether partial pressure or volume % is preserved; clinical potency tracks partial pressure. Desflurane electronic units differ — know the principle that partial pressure drives anaesthesia. [3]
Output estimation (conceptual)
If chamber saturates at fraction F_sat = SVP/P_atm and splitting ratio sends fraction f through chamber, delivered fraction ≈ f × F_sat (idealised). Dial engineering implements the non-linear mapping because F_sat is large. [1]
Pre-use checks (with machine checklist)
- Correct agent, filled (not overfilled), upright
- Interlock works
- No leaks on mount
- Dial moves freely; zero when off
- For desflurane: powered, warmed, no fault alarms
- AAGBI machine check includes vaporiser seating and leaks [1]
SAQ scaffold
- Draw variable-bypass principle.
- SVP table and why desflurane special.
- Temperature compensation mechanism.
- Safety interlocks and keyed fillers.
- Draw-over vs plenum.
- Effect of tipping/overfilling (danger of liquid in bypass). [2]
Viva phrases
- "What happens if you tip a full vaporiser?" → "Liquid agent may enter the bypass, delivering a potentially lethal concentration — take out of service and service protocol."
- "Why not put desflurane in a sevo vaporiser?" → "SVP and boiling point make output dangerously high and uncontrolled; keyed fillers prevent it." [3]
Common traps
- Filling sevo vaporiser with isoflurane.
- Leaving vaporiser on during machine check flush without awareness.
- Using desflurane vaporiser unplugged.
- Forgetting interlock failure scenarios with two agents. [1]
Variable-bypass plenum
- Sevo/iso/halothane
- Temp compensated
- Agent-specific
- Flow-resistant
Desflurane special
- Heated ~39 °C
- Pressurised
- Electronic
- Needs power
Draw-over
- Low resistance
- Field use
- Less perfect compensation
- Manual skill
Safety systems
- Keyed filler
- Interlock
- Level window
- Anti-wrong-agent
Integrated exam drill sheet
Sixty-second version
Say the definition, the critical number or sequence, the main clinical use, and the top red flag. Stop. If you cannot do this without notes, the topic is not yet learnable.
Three-minute version
Add mechanism, a comparison table spoken aloud, one special population, and one crisis stem with first actions. This is the standard viva unit.
Ten-minute mastery version
Add equipment detail or procedural steps, evidence limits, second-line options, and a teach-the-junior summary. This is Final long-case depth.
Written SAQ timing
For a 10-minute SAQ, spend one minute planning headings, seven minutes writing, two minutes checking hard stops and units. Headings should mirror examiner dimensions: definition, mechanism or anatomy, clinical application, complications, special situations.
Common mark-losing behaviours
- Lists without mechanisms
- Mechanisms without clinical action
- Doses without route or monitoring
- Landmarks without injury consequences
- Device talk without re-enable or backup plans
- Absolute claims where practice is protocol-dependent
Positive mark-gaining behaviours
- Numbers with units and approximate ranges
- Explicit assumptions for equations
- Side-by-side comparisons
- Named hard contraindications
- Monitoring endpoints
- Clear escalation
Cross-specialty board alignment
ANZCA Primary and Final, FRCA Primary and Final, ABA, EDAIC and FCAI all test these leaves repeatedly because they are portable across subspecialties. A candidate who owns flow physics, electrical safety, neck and neuraxial anatomy, vaporiser principles and core adjunct pharmacology can survive stems in ICU transfer, obstetric haemorrhage, thoracic lists and outpatient dental anaesthesia alike.
Personal rehearsal script
Read the AnswerCard twice. Cover it and rewrite it from memory. Speak the red flags. Draw one table from memory. Answer one hostile interruption. Then move on. Spaced repetition beats marathon re-reading.
Safety culture close
Every technical topic ends in patient safety: do not expand closed gas spaces, do not dilate arteries, do not leave ICD therapies off, do not apply Poiseuille in turbulence, do not ignore conus level, do not tip a full vaporiser back into service without protocol, and do not stack serotonergic weak opioids casually. Knowledge is only exam-pass when it prevents harm.
Topic-specific mastery addendum
Layered recall sequence
- Recite the AnswerCard from memory.
- Draw the key table (layers, nerves, or vaporiser types) from blank paper.
- Speak two viva stems with full answers.
- List every red flag without looking.
- Teach the complication map as a chain: error → injured structure → clinical syndrome → immediate management.
Procedural narration standard
Narrate as if a consultant is watching: position, asepsis or machine check, landmark or ultrasound view, needle or dial action, endpoint, confirmation test, contingency if endpoint missing, and documentation. This narration style scores in OSCE-like and viva settings because it proves usable competence rather than passive recognition.
Numbers and relations to keep hot
Keep a personal card of the five hottest facts for this leaf and revisit them daily for a week. For neuraxial spaces that means conus level, Tuffier estimate, midline tissue sequence, epidural contents and neonatal difference. For cranial nerves that means V/IX/X airway map, SLN versus RLN, oculocardiac pathway and Horner triad. For vaporisers that means splitting ratio, SVP contrast for desflurane, temperature compensation idea, keyed fillers/interlocks and tip-over danger.
Error museum
Build an "error museum" of classic failures: spinal at L1/2 in adults; dilating an artery; leaving vaporiser tipped in service; missing bilateral RLN injury risk; assuming magnet behaviour is universal; ignoring delayed respiratory depression after neuraxial morphine. Each exhibit should have the false belief, the correct belief, and the protective habit.
Link-forward reading
After mastering this leaf, deliberately link to the next clinical topic in the same sitting: neuraxial anatomy to CSE and caudal; cranial nerves to awake FOI and eye surgery reflexes; vaporisers to volatile agent pharmacology and circle-system low flow. Linked encoding is more durable than isolated topics.
Worked vaporiser stems
Stem — end-tidal agent zero with dial on. Check empty sump, mount leak, wrong interlock position, or for desflurane power and warm-up faults before blaming the gas analyser.[1]
Stem — why desflurane needs a special vaporiser. Boiling point about 22.8 °C and SVP near atmospheric pressure mean a standard variable-bypass design cannot control output safely; heated pressurised injectors are required. [2]
Stem — tipped vaporiser. Liquid may enter the bypass and deliver a potentially lethal concentration. Remove from service and follow service protocol; do not “run it empty and hope.” [3]
Stem — altitude question. Clinical potency tracks partial pressure. Variable-bypass behaviour with altitude is often taught as roughly preserving partial pressure output more than volume percent; state the principle and avoid over-precise folklore. [1]
Stem — machine check. Confirm seating, interlock, filler integrity, level, and that only one vaporiser can open. AAGBI-style checks include vaporiser leaks and security on the back bar.[1]
Splitting ratio language: FGF divides into bypass and chamber streams; chamber gas is saturated at SVP; streams rejoin to the dialled concentration. Temperature compensation prevents cooling-related fall in output as vaporisation steals heat. [2]
Red flags
References
- [1]AAGBI, Hartle A, Anderson E. Checking anaesthetic equipment 2012: association of anaesthetists of Great Britain and Ireland Anaesthesia, 2012.PMID 22563957
- [2]Tiviraj S, et al. Development of An Assessment Test for An Anesthetic Machine J Med Assoc Thai, 2016.PMID 27501622
- [3]Parthasarathy S, Ravishankar M. The closed circuit and the low flow systems Indian J Anaesth, 2013.PMID 24249885