ICU · Anatomy
Functional Anatomy for ICU Procedures
Also known as Procedure anatomy · Cricothyroidotomy · Cricothyroid membrane · Tracheostomy · Chest drain safe triangle · Lumbar puncture · Intraosseous access · Pericardiocentesis · Central venous catheter anatomy · Internal jugular vein · Radial artery cannulation · Allen test · Intercostal neurovascular bundle · Cauda equina · Ligamentum flavum
Functional anatomy for common ICU procedures: the cricothyroid membrane (cricothyroidotomy), the tracheal rings and thyroid isthmus (tracheostomy), the chest-drain safe triangle (5th intercostal space, anterior axillary line), the lumbar-puncture ligament layers (L3-L4, below the conus), the internal jugular vein and carotid sheath (central venous catheter), the radial artery and palmar arches (arterial line, Allen test), the intraosseous sites (proximal tibia), and the subxiphoid route for pericardiocentesis.
On this page & tools
Your progress
Saved locally on this device.
8 MCQs with explanations
Target exams
Overview
Each bedside ICU procedure has a small set of anatomical landmarks that make it safe. This topic covers the landmarks and the structures to avoid for cricothyroidotomy, tracheostomy, chest-drain insertion, lumbar puncture, intraosseous access, central venous catheterisation, arterial line cannulation, and pericardiocentesis.[1]
For the First Part examiner the recurring thread is the same: a constant relationship between a palpable surface landmark and a deep target, a short list of nearby structures that the procedure can injure, and a safety rule derived from that anatomy (enter above the rib; stay below the conus; aim through the avascular midline membrane; keep the carotid medial and posterior to the needle). Memorise the landmark, the adjacent danger structures, and the safety rule for every procedure — that triplet is the viva answer.[1][1]
Cricothyroidotomy (emergency front-of-neck access)
Relevant anatomy
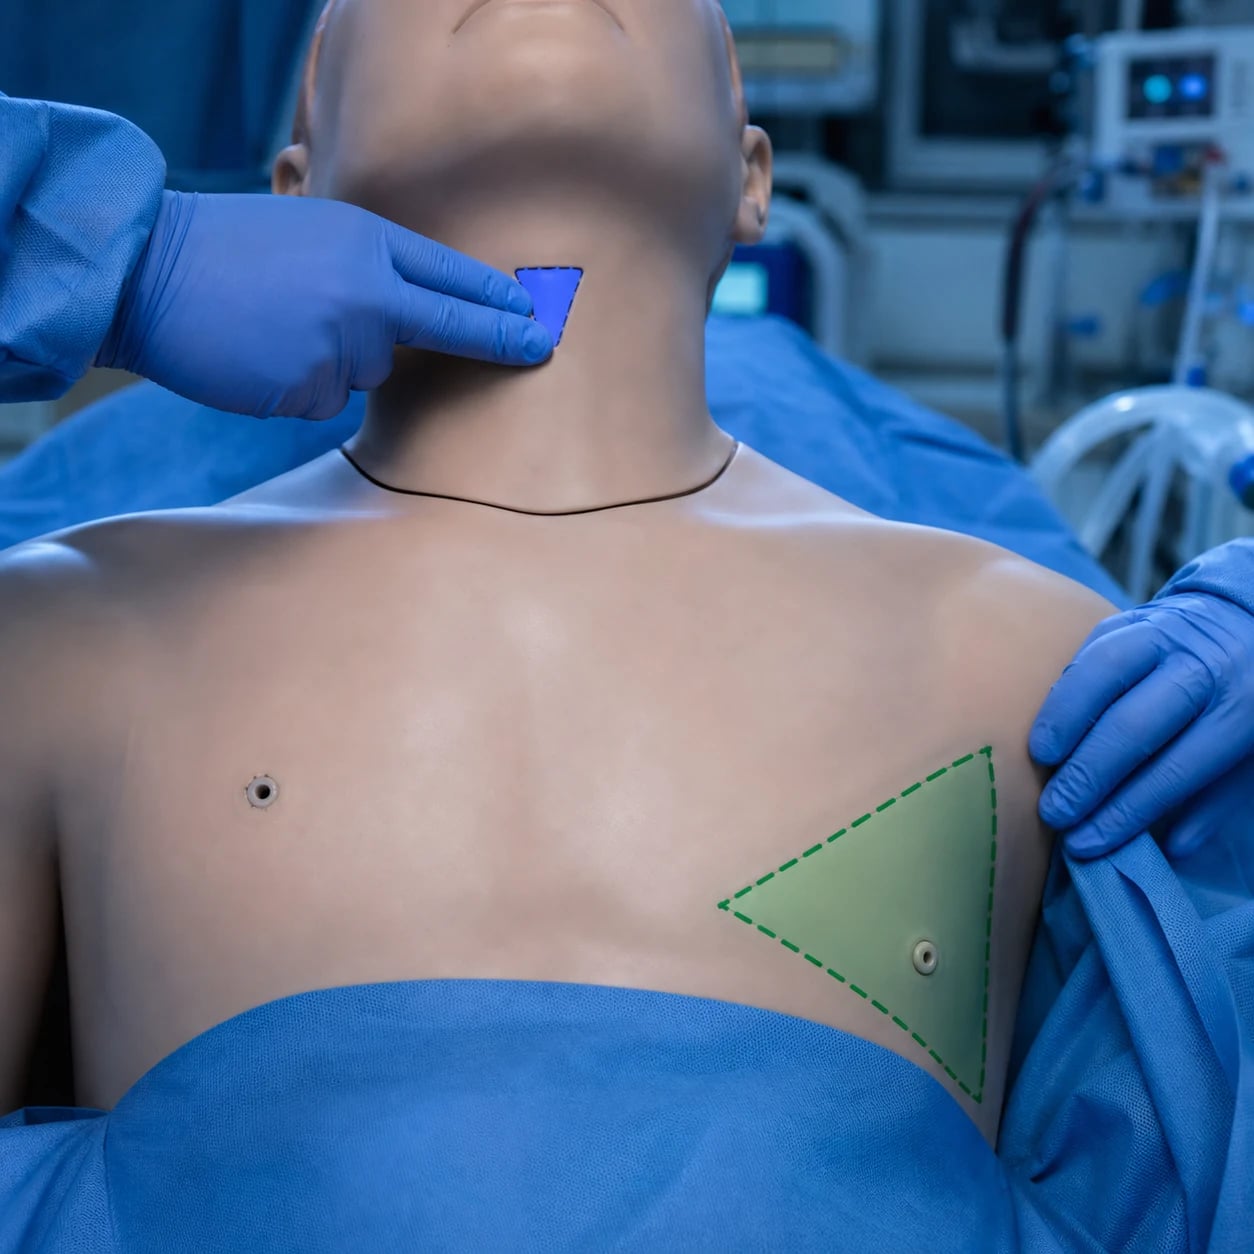
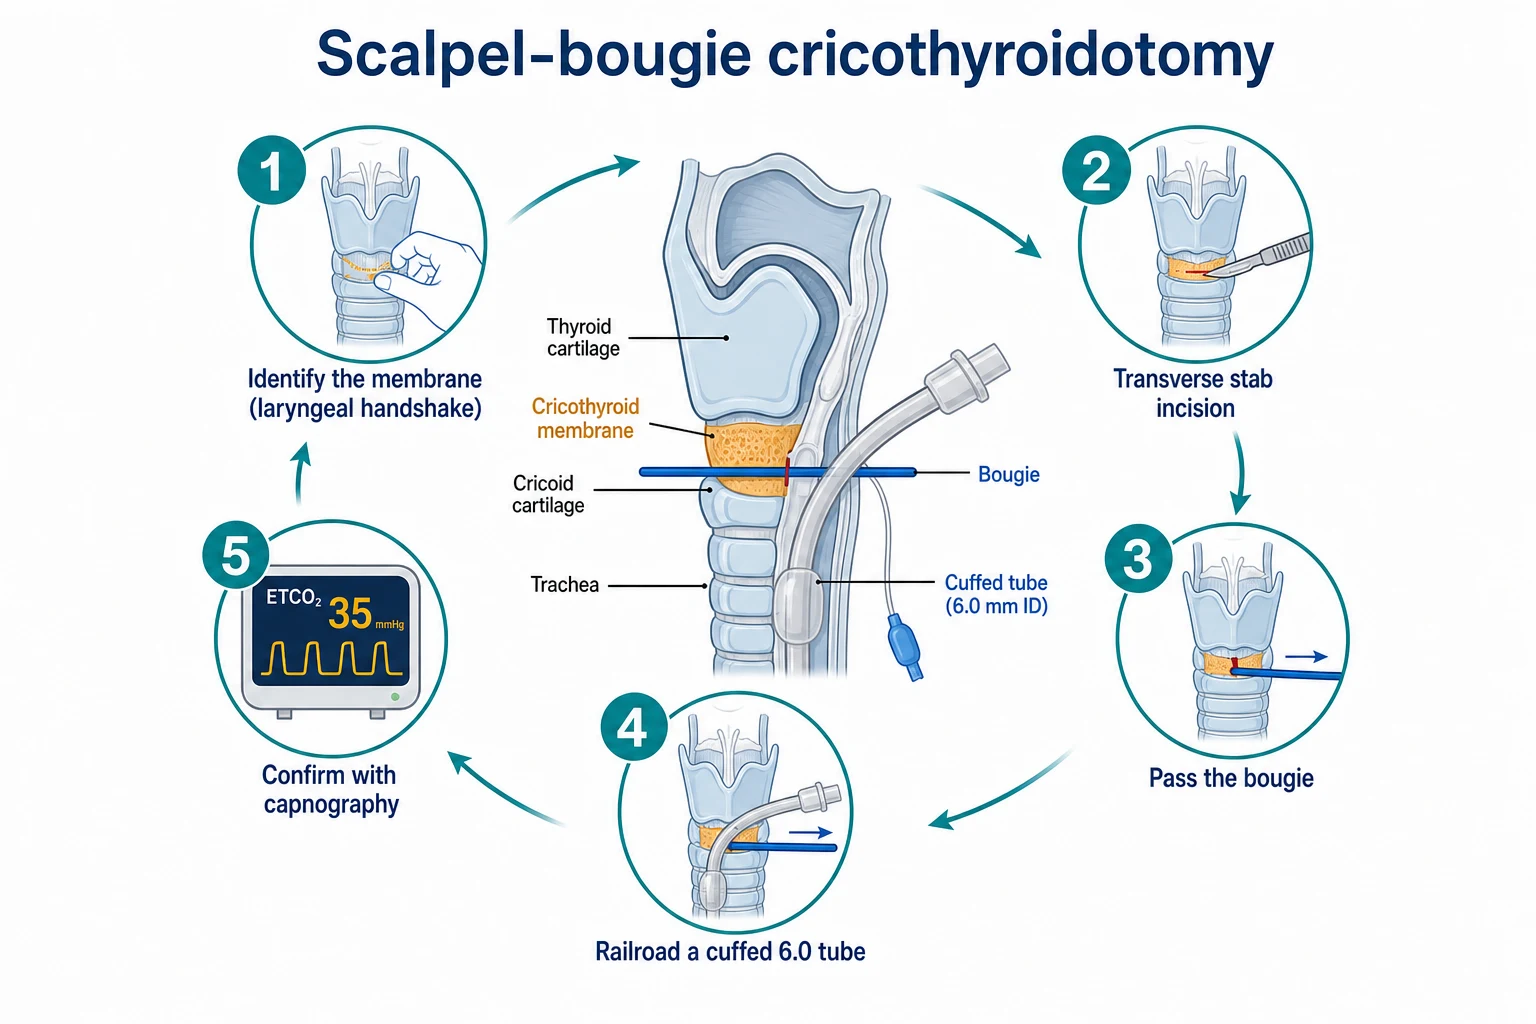
The cricothyroid membrane (median cricothyroid ligament) is a flat, fibroelastic sheet that stretches in the midline between the thyroid cartilage above (its prominent lower border — the inferior thyroid notch) and the cricoid cartilage below (the firm, complete, signet-ring-shaped first tracheal cartilage). It is the most superficial part of the airway: covered only by skin, subcutaneous fat, and the anterior jugular veins / cricothyroid artery branches. Because it is midline, avascular in its lower third, and below the vocal cords (which sit inside the thyroid cartilage at the level of the cricothyroid joint), it is the ideal site for emergency access when orotracheal intubation has failed.[1][1]
The structures that surround it and must be respected: [1]
- The cricothyroid muscles lie laterally, running upwards and backwards from the cricoid to the inferior thyroid horn — a midline puncture or incision keeps the needle/scalpel between them and avoids bleeding.[1]
- The cricothyroid artery (a branch of the superior thyroid artery) runs transversely across the upper third of the membrane, with its counterpart on the other side, forming a small anastomotic arch in the midline. Incise the LOWER third of the membrane to stay below these vessels.[1][1]
- The recurrent laryngeal nerve runs in the tracheo-oesophageal groove just posterior to the cricoid — a posteriorly directed needle can injure it.[1]
- The oesophagus lies directly posterior to the cricoid and upper trachea — a needle passed too steeply backwards can perforate it (oesophageal/tracheal injury and false passage).[1]
The cricoid cartilage is the only complete ring of the airway and acts as a structural buttress; it is also the landmark used for Sellick's manoeuvre (cricoid pressure) during RSI. The thyroid cartilage is the largest laryngeal cartilage; its laryngeal prominence (Adam's apple) is the upper landmark — the membrane is felt as a soft dip immediately below it. [1]
Techniques
Scalpel–finger–bougie surgical cricothyroidotomy (DAS 2015 'standard technique')
- IDENTIFY THE MEMBRANE: laryngeal handshake — non-dominant hand grasps the larynx, little finger on the cricoid; the index finger palpates the dip between the thyroid prominence above and the firm cricoid ring below — this is the cricothyroid membrane.[1]
- STAB INCISION (scalpel in dominant hand): a transverse stab through skin AND membrane in the midline of the lower third of the membrane, blade in place, no withdrawal.
- TURN THE BLADE 90° to open the airway, then hook the little finger (or bougie dilator) into the stoma to maintain the tract — never lose the hole.
- PASS THE BOUGIE through the incision, angled caudally down the trachea; resistance at the carina or the "hold-up" confirms tracheal (not oesophageal) placement.
- RAILROAD a cuffed tube (usually a 6.0 mm cuffed ETT) over the bougie until the cuff is just through the membrane; inflate and confirm with waveform capnography.[1]
Emergency front-of-neck access (FONA) techniques
| Technique | What is placed | Indication / setting | Key anatomical points |
|---|---|---|---|
| Surgical cricothyroidotomy (scalpel–finger–bougie) | Cuffed 6.0 ETT through the membrane | Adult CICO ('can't intubate, can't oxygenate') — DAS first-line | Lower third of the membrane, midline, transverse incision, avoid cricothyroid artery arch above |
| Needle cricothyroidotomy | Large-bore (12–14 G) cannula | Paediatric <8–10 yr (narrow cricoid — surgical contraindicated), or temporising in adults | Same membrane; cannula angled 45° caudally; needs a high-pressure jet ventilator (transtracheal jet ventilation) |
| Percutaneous (Seldinger) cricothyroidotomy | Cuffed mini-trach/Melker set | Elective / semi-elective access | Wire-through-cannula then dilator; same lower-third site |
Tracheostomy
A formal tracheostomy is placed through the 2nd to 4th tracheal rings, staying below the thyroid isthmus (which crosses the 2nd to 3rd rings) and above the first ring (the cricoid).[1]
- The skin incision is transverse, halfway between the cricoid and the sternal notch. The pre-tracheal fascia is divided, strap muscles (sternohyoid, sternothyroid) retracted laterally in the midline, the thyroid isthmus is divided or retracted superiorly, and the trachea is opened between the 2nd and 3rd (or 3rd and 4th) rings with a vertical (or Björk flap) incision.[1][1]
- Avoid placing the stoma too low (erosion into the brachiocephalic artery, and risk of tracheo-innominate fistula) or too high (subglottic stenosis, first-ring/cricoid damage — the cricoid is the narrowest part of the paediatric airway).[1]
- A percutaneous dilatational tracheostomy (Ciaglia) uses bronchoscopic guidance and a Seldinger technique between the same rings; the dilator enters between the 1st and 2nd or 2nd and 3rd rings.[1]
Central venous catheterisation — internal jugular vein
Relevant anatomy
The internal jugular vein (IJV) emerges from the jugular foramen at the skull base, exits the cranium, and descends in the carotid sheath — a fascial condensation that also contains the common/internal carotid artery and the vagus nerve. The constant relationship that underpins safe cannulation is this: within the carotid sheath, the IJV lies LATERAL and SUPERFICIAL (anterolateral) to the carotid artery, which is MEDIAL and POSTERIOR (deep); the vagus nerve sits POSTERIORLY between the two, in the posterior angle.[1][1]
The vein runs deep to the sternocleidomastoid (SCM) muscle throughout its course. The SCM has two heads — a sternal head (medial, attaching to the manubrium) and a clavicular head (lateral, attaching to the medial third of the clavicle) — which diverge inferiorly to form the surface triangle (the lesser supraclavicular fossa). The IJV pierces the deep cervical fascia and joins the subclavian vein behind the sternoclavicular joint to form the brachiocephalic (innominate) vein; on the right the brachiocephalic vein runs a short, straight course to the superior vena cava and right atrium, which is why the right IJV is the preferred site.[1]
The IJV varies with respiration and volume status — it collapses (or narrows) on inspiration/upright posture and distends on expiration/head-down (Trendelenburg) position; placing the patient head-down (15–20°) distends the vein and reduces the risk of air embolism.[1]
The danger triangle / structures at risk
Structures at risk during IJV cannulation and how anatomy protects them
| Structure | Relationship to IJV | How to avoid injury |
|---|---|---|
| Common carotid artery | Medial and posterior/deep to IJV within the carotid sheath | Keep needle tip LATERAL to the palpated carotid pulse; ultrasound shows the round, pulsatile, non-compressible artery medial to the oval, compressible vein |
| Vagus nerve (CN X) | Posterior, between artery and vein in the sheath | Midline/lateral approach with ultrasound avoids the posterior angle |
| Apex of the lung / pleura | Deep and lateral, beneath the subclavian vessels at the thoracic inlet | Avoid a low approach (which becomes subclavian territory); keep the puncture above the level of the cricoid |
| Thoracic duct (LEFT side only) | Arches in the left neck to drain into the left venous angulus | Prefer the RIGHT IJV to avoid chylothorax |
| Phrenic nerve | Deep to SCM, on scalenus anterior, lateral to IJV | Lateral/posterior needle deviation can injure it |
| Stellate ganglion / sympathetic chain | Anterior to scalenus anterior at the root of the neck | High/lateral deviation may cause Horner's |
| Brachial plexus | Deep and lateral, between scalenus anterior and medius | Avoid a posterior approach toward the interscalene groove |
Approaches
- High central (apex-of-triangle) approach — the most common ultrasound-guided route. The probe is placed at the apex between the two SCM heads (the carotid is identified medially as a round pulsatile structure, the IJV laterally as a compressible oval). The needle enters in-plane or out-of-plane, lateral to the carotid, aiming at the IJV. Puncture at about the level of the cricoid cartilage (C6).[1][1]
- Low approach — just above the clavicle in the triangle between the two SCM heads; closer to the pleura (pneumothorax risk) and the subclavian, less used now that ultrasound is universal.[1]
- Posterior approach — along the posterior border of SCM; greater risk to the brachial plexus and phrenic nerve.
Ultrasound guidance and the central-line bundle
Ultrasound-guided right IJV cannulation and the insertion bundle
- POSITION: head-down (Trendelenburg 15–20°) to distend the vein; head turned slightly AWAY (30–45°) — over-rotation stretches the vein over the carotid and narrows it, increasing puncture risk.[1]
- ULTRASOUND SURVEY: high-frequency linear probe transverse at the cricoid level — identify the IJV (oval, compressible) lateral to the carotid (round, pulsatile, non-compressible); confirm patency and the absence of thrombus (compressibility).
- MAXIMAL STERILE BARRIERS: cap, mask, sterile gown and gloves, full-body drape; 2% chlorhexidine skin prep; allow to dry.[2]
- IN-PLANE NEEDLE ADVANCEMENT: under continuous ultrasound vision, advance the needle to puncture the anterior wall only (avoid through-and-through puncture of the posterior wall); aspirate dark venous blood.[1]
- SELDINGER: pass the J-wire; confirm wire-in-vein on ultrasound (short-axis and long-axis views) AND that the wire does NOT cross the midline (which would mean oesophageal/carotid misplacement); dilate and insert the catheter to the correct depth (right IJV ≈ 15 cm).[1]
- CONFIRM AND SECURE: aspirate and flush all lumina; chest X-ray to confirm tip at the cavo-atrial junction and exclude pneumothorax.[1]
- THE BUNDLE (Pronovost/Keystone): hand hygiene, maximal sterile barriers, chlorhexidine skin prep, optimal site (avoid femoral), daily review with prompt removal — these reduce catheter-related bloodstream infection.[2]
Site selection
CVC site selection — anatomy-driven trade-offs
| Site | Anatomical advantages | Anatomical disadvantages | When preferred |
|---|---|---|---|
| Right IJV | Straight path to right atrium; ultrasound-guided; compressible if haematoma | Pneumothorax risk (low, <1%); infection risk of central sites | FIRST CHOICE for most ICU CVCs and for CRRT/dialysis access |
| Subclavian | Lowest infection rate; comfortable for patient; vein fixed (does not collapse) | PNEUMOTHORAX risk higher (1–5%); non-compressible — avoid in coagulopathy; SUBCLAVIAN STENOSIS risk — destroys future AV fistula | Long-term access in patients with normal clotting who will NOT need a dialysis fistula |
| Left IJV | Available when right IJV thrombosed | Tortuous course through left innominate — kinking, tip malposition (into IJV down the other side), thoracic duct on left | Second-line |
| Femoral | Compressible; no pneumothorax; away from neck/mediastinum | Highest infection rate; DVT risk; patient immobile; higher recirculation | Immediate access in cardiac arrest / catastrophic bleeding / severe coagulopathy; obese patient if IJV not feasible |
The 3SITES trial (Parienti 2015, NEJM) randomised catheter site and found: subclavian had lower bloodstream infection and DVT but MORE symptomatic pneumothorax; the trade-off is infection/bleeding risk (femoral/IJV) vs mechanical risk (subclavian). The choice is individualised: subclavian when infection risk dominates and clotting is normal, IJV when ultrasound access and compressibility dominate, femoral for emergency/coagulopathic access.[3]
Arterial line — radial artery cannulation
Relevant anatomy
The radial artery is one of the two terminal branches of the brachial artery, dividing in the cubital fossa (opposite the neck of the radius) into the radial and ulnar arteries. The radial artery descends in the forearm under the brachioradialis, then at the wrist lies superficially, LATERAL to the tendon of flexor carpi radialis and medial to the abductor pollicis longus — this superficial, palpable position makes it the preferred site for arterial cannulation. It crosses the scaphoid and trapezium in the anatomical snuffbox (where it is also palpable) and enters the hand dorsally before becoming the deep palmar arch (mainly radial contribution). The ulnar artery is the larger terminal branch; it runs medial to the flexor carpi ulnaris, crosses the wrist in Guyon's canal, and forms the superficial palmar arch (mainly ulnar contribution). The two arches anastomose across the palm, so that occlusion of one artery is normally compensated by the other — the anatomical basis of the Allen test.[1][1]
Allen test (and modified Allen test)
The Allen test assesses whether the ulnar artery can perfuse the hand alone (i.e. whether the palmar arch is intact) before cannulating the radial artery. If the ulnar supply is inadequate, radial cannulation could devascularise the hand. [1]
Modified Allen test
- The patient clenches the fist several times to exsanguinate the hand (the examiner can assist by milking blood out).
- The examiner compresses BOTH the radial and ulnar arteries at the wrist.
- The patient opens the hand — it should be pale/white (exsanguinated).
- The examiner releases the ULNAR artery only (keeping the radial compressed) and TIMES the return of normal colour to the palm.
- Interpretation: colour return <5–7 seconds = normal (intact ulnar/palmar arch — radial cannulation safe); 7–15 seconds = equivocal/incomplete (caution); >15 seconds = abnormal (do NOT cannulate the radial artery on this side — the hand depends on it).[1][1]
- The modified Allen test uses pulse oximetry or Doppler on the thumb/finger to detect flow objectively (more reliable than visual colour return).
Note: the predictive value of the Allen test for distal ischaemia is poor — many clinicians cannulate the radial artery without an Allen test and rely instead on monitoring the hand for ischaemia. However, examiners expect you to be able to perform and interpret it.[1]
Technique, depth, and complications
The radial artery at the wrist is 2–4 mm below the skin, just lateral to the flexor carpi radialis tendon. A 20 G (or 22 G) cannula is used, inserted at 30–45°, either by palpation or under ultrasound. The wrist is dorsiflexed over a roll to bring the artery superficial. The cannula has a risk of thrombotic occlusion (common — transient radial pulse loss in up to 20%, permanent occlusion in ~1%), distal ischaemia (rare but catastrophic — higher in low-flow states, vasopressors, Raynaud's, DIC), infection, haematoma, and pseudoaneurysm.[1]
Arterial line sites — anatomy and trade-offs
| Site | Anatomical advantage | Anatomical disadvantage | Notes |
|---|---|---|---|
| Radial | Superficial, lateral to FCR tendon; collateral flow via ulnar (Allen test) | Small calibre; thrombosis/occlusion risk; ischaemia in low-flow/vasopressors | FIRST CHOICE — most common |
| Femoral | Large, easy in shock; reflects central aortic pressure | Atherosclerosis; infection; retroperitoneal haematoma; non-sterile area | Good for arrest / profound shock, short-term |
| Brachial | Good waveform; reflects central pressure | NO collateral to the forearm — ischaemia risk; median nerve injury; compartment syndrome | Generally AVOIDED — end-artery territory |
| Axillary | Large; tolerated for long-term | Near brachial plexus; haematoma compresses plexus | Left axillary reflects central aorta |
| Dorsalis pedis / posterior tibial | Alternative when upper-limb sites unavailable | Smaller; peripheral — waveform damped; not reliable in PVD |
Chest drain insertion
The safe site and the SAFE triangle
The safe site is the 5th intercostal space, anterior axillary line, within the SAFE triangle:[1][1]
- Skin — lateral to the pectoralis major (avoid the breast and the long thoracic nerve)
- Axilla — anterior border of latissimus dorsi is the posterior boundary
- Fifth intercostal space — above the diaphragm (the diaphragm rises to the 5th rib in mid-inspiration)
- Edge of the pectoralis major — anterior boundary [1]
The full safe triangle is bordered posteriorly by the anterior edge of latissimus dorsi, anteriorly by the lateral edge of pectoralis major, superiorly by a horizontal line below the axilla (the 4th/5th intercostal space), and inferiorly by the 5th intercostal space (above the diaphragm). Staying within this triangle avoids the long thoracic nerve (latissimus border — injury denervates serratus anterior → winged scapula), the intercostobrachial nerve, the internal mammary vessels (medial), and the diaphragm/liver/spleen (inferior).[1][1]
The intercostal neurovascular bundle — the cardinal safety rule
To avoid the intercostal neurovascular bundle, enter just ABOVE the rib (along its upper border). The intercostal vein, artery, and nerve (VAN — from superior to inferior) run together in the costal groove along the inferior border of each rib. A needle or drain passed along the lower border of a rib therefore lies directly on the neurovascular bundle of the rib ABOVE it and risks bleeding (intercostal artery laceration), neuralgia, and a falsely low drain output. Passing along the UPPER border of the rib places the tract in the relatively avascular/aneural middle of the intercostal space.[1][1]
The collateral neurovascular bundle (a smaller branch) runs just below each rib along its superior border, but it is small; the dominant bundle is in the costal groove. The mnemonic is "above the rib, not below" (or "VAN rides the underside of the rib"). [1]
Parietal pleura and the pleural space
The chest wall is lined by the parietal pleura (sensitive — innervated by intercostal nerves, hence pain on irritation); the lung is covered by visceral pleura (insensitive). Between them is the potential pleural space, normally containing only a thin film of fluid. A chest drain enters through the parietal pleura into this space to evacuate air (pneumothorax — air rises to the apex) or fluid (effusion, haemothorax, empyema — fluid gravitates to the base). The drain tip is directed apically for air and basally for fluid. Ultrasound (or CT) confirms the presence and depth of fluid and identifies adhesions/loculations BEFORE insertion — never insert a chest drain "blind" into a loculated or partly-adhered pleural space.[1][1]
Chest drain insertion — the Seldinger (small-bore) and blunt-dissection (large-bore) routes
- ULTRASOUND / imaging first: confirm the side, the presence of air/fluid, the depth to pleura, and the absence of adhesions. Mark the site at the 5th ICS, anterior axillary line, within the safe triangle.[1]
- STERILE prep, local anaesthetic (lidocaine with adrenaline) infiltrated at the upper border of the LOWER rib (i.e. just above the rib) — aspirate as you advance to avoid intravascular injection; infiltrate periosteum, intercostal muscle, and parietal pleura.
- SMALL-BORE Seldinger (8–14 Fr) — for most pneumothoraces and uncomplicated effusions: needle above the rib, aspirate air/fluid, pass the wire, dilate, railroad the drain; connect to an underwater seal.[1]
- LARGE-BORE blunt dissection (24–32 Fr) — for haemothorax/empyema/trauma: 2–3 cm incision parallel to and ABOVE the rib; blunt-dissect through intercostals down to pleura with a clamp; finger-sweep to clear adhesions and confirm entry into the pleural space; insert the tube over a trocar-less technique (trocar use increases visceral injury).[1]
- DIRECT the tip — apically for pneumothorax, posterobasally for fluid; secure, connect to underwater seal (or suction –10 to –20 cmH₂O); confirm position with a chest X-ray.[1]
Lumbar puncture
Relevant anatomy
The spinal cord in the adult terminates as the conus medullaris at the lower border of L1 / upper L2 vertebral body (variable, from T12 to L3; in the newborn it ends at L3 and ascends as the vertebral column grows). Below the conus, the thecal sac contains the cauda equina — the lumbosacral nerve roots floating freely in CSF. A needle introduced below L2 enters the subarachnoid space among these freely mobile roots, which are pushed aside rather than transected; a needle aimed too high risks striking the cord itself.[1][1]
The interspinous space is the gap between two adjacent spinous processes, palpated as soft dips between the bony prominences in the midline of the lumbar spine. With the patient flexed (fetal position or seated and leaning forward), the spinous processes gape apart and the interspinous space widens, easing needle passage. [1]
Ligament layers pierced
The needle traverses, from superficial to deep: [1]
- Skin and subcutaneous fat
- Supraspinous ligament — a strong fibrous cord joining the tips of the spinous processes from C7 to the sacrum
- Interspinous ligament — connecting the adjacent spinous processes, filling the interspinous space
- Ligamentum flavum — paired thick elastic ligaments connecting the laminae of adjacent vertebrae; piercing it gives the characteristic "pop" / resistance-then-give as the needle enters the epidural space
- Epidural space (containing fat and the epidural venous plexus)
- Dura mater — tough outermost meningeal layer; puncture gives a second, subtler "give"
- Arachnoid mater — delicate middle layer; together with the dura it forms the "dura-arachnoid" puncture
- Subarachnoid space — contains CSF; CSF flows from the needle when the stylet is removed [1]
The combined "pop" (ligamentum flavum) signals the epidural space; for an epidural, stop here and inject; for a lumbar puncture, advance a further 1–2 mm through dura-arachnoid to reach CSF.[1][1]
Level selection and Tuffier's line
The safe interspaces are L3–L4 or L4–L5. The landmark is Tuffier's (supracristal) line — a line joining the highest points of the two iliac crests — which crosses the L4 spinous process (or the L4–L5 interspace). Palpate the iliac crests, draw the line, and choose the interspace at or just below it; this reliably places the needle below the conus.[1]
Diagnostic lumbar puncture at L3–L4
- POSITION: lateral decubitus, fetal position (knees to chest, chin to chest) to open the interspinous spaces — or seated, leaning forward over a table. For an accurate opening pressure, the patient MUST be in the lateral decubitus position with legs extended at the moment of measurement.[1]
- LANDMARK: Tuffier's line (joining the iliac crests) crosses L4; palpate the L3–L4 interspace (one space above) or L4–L5 (at the line).
- STERILE prep; infiltrate local anaesthetic (lidocaine) into skin and subcutaneous tissue in the midline at the chosen interspace.
- INSERT the spinal needle (20–22 G Whitacre/Sprotte or Quincke) in the midline, bevel parallel to the long axis of the spine (for non-cutting needles this matters less), aiming slightly cephalad (toward the umbilicus).[1]
- ADVANCE through supraspinous, interspinous, ligamentum flavum (POP — epidural space), dura-arachnoid (second give) — remove the stylet and check for CSF flow; if bone is hit, withdraw to the subcutaneous tissue and redirect.[1]
- MEASURE the opening pressure (manometer, patient relaxed, legs extended) and collect CSF (typically 3–4 tubes of 1–2 mL each for cell count, protein/glucose, microbiology, and saved cell/extra).
- REPLACE the stylet before withdrawing the needle (reduces arachnoid strand entrapment and post-dural-puncture headache).[1]
Spinal vs epidural needles — anatomy and post-dural-puncture headache
| Feature | Spinal (subarachnoid) needle | Epidural needle (Tuohy) |
|---|---|---|
| Target | Subarachnoid space (CSF) | Epidural space (just outside the dura) |
| Size | 20–27 G, fine | 16–18 G, large |
| Tip | Quincke (cutting) or Whitacre/Sprotte (pencil-point) | Curved (Tuohy) — directs the catheter cephalad |
| Landmark of entry | "Pop" through ligamentum flavum, then dura-arachnoid | "Pop" through ligamentum flavum only — STOP (loss of resistance to saline/air) |
| Post-dural-puncture headache | Higher with cutting/larger gauge; pencil-point reduces it | If it accidentally dural-punctures, the large bore → very high PDPH risk |
Intraosseous access
Used when venous access fails in an emergency; the commonest adult site is the flat anteromedial aspect of the proximal tibia, about 2-3 cm below the tibial tuberosity, avoiding the growth plate in children (below the tuberosity in adults, above it in children to protect the proximal tibial growth plate).[1]
The marrow cavity of a long bone drains via the emissary / nutrient veins directly into the central venous circulation — the IO route is therefore functionally a central line: any drug, fluid, or blood product that can be given IV can be given IO at equivalent dose, and onset times are similar.[1]
Alternatives: the distal tibia (medial malleolus, 3 cm proximal), the proximal humerus (greater tubercle — fastest drug onset and fluid flow in adults), and (in children) the distal femur (2–3 cm above the condyles, in the midline).[1][1]
IO access sites — anatomical considerations
| Site | Landmark | Advantage | Caution |
|---|---|---|---|
| Proximal tibia (adult first choice) | 2–3 cm below tibial tuberosity, anteromedial flat aspect | Easy, away from joints | Avoid growth plate in children (stay below tuberosity in adults; above/medial in children) |
| Proximal humerus | Greater tubercle, with arm adducted and hand on abdomen | Highest flow rate; fastest drug onset | Slightly harder to stabilise; shoulder pain |
| Distal tibia | 3 cm proximal to medial malleolus, flat anteromedial tibia | Alternative when proximal sites unusable | Avoid posterior tibial neurovascular bundle |
| Distal femur (children) | 2–3 cm above the condyles, midline | Used when tibial sites unsuitable | Adult marrow is fatty, less reliable |
Pericardiocentesis
The subxiphoid approach is the standard emergency route: insert the needle just below and to the left of the xiphisternum, aiming toward the left shoulder at about 30-45 degrees, aspirating as you advance to avoid the right ventricle.[1]
- The rationale for aiming at the left shoulder: the pericardium sits posterior and slightly leftward beneath the xiphoid, and this trajectory passes below the costal margin, below the lung (avoiding pleura), and over the liver (left lobe) toward the pericardial sac, missing the right ventricle anteriorly and the left ventricle laterally until the effusion is reached.[1]
- Echocardiographic (subxiphoid or apical) guidance reduces the risk of puncturing the RV; the internal thoracic (mammary) vessels run just lateral to the sternum (avoid a too-medial/sternal trajectory → laceration and bleeding into the mediastinum), and the liver (right) and lung/pleura (lateral) are the surrounding structures to avoid.[1][1]
- The apical approach (5th ICS, mid-clavicular line, 1–2 cm lateral to the apex beat, aiming at the right shoulder) is an alternative when echocardiography shows a large apical effusion; it risks the pleura and the left internal mammary artery.[1]
Exam practice — SAQs
SAQ — Bronchoscopy anatomy and complications in the ventilated ICU patient
10 minutes · 10 marks
A 65-year-old smoker, intubated and ventilated for a severe COPD exacerbation, is on ICU day 4. On the morning round he has increased secretions, a rising FiO2 requirement (0.6 to 0.85), and chest X-ray shows new right upper lobe collapse. The consultant asks you to perform a therapeutic flexible bronchoscopy to clear a suspected mucus plug. He is on noradrenaline 0.12 mcg/kg/min, ventilated volume-control Vt 450 mL, PEEP 8, FiO2 0.85, with an 8.0 mm cuffed ETT.
SAQ — Chest drain insertion: safe triangle and intercostal anatomy in traumatic pneumothorax
10 minutes · 10 marks
A 28-year-old man is brought to the emergency department after a single stab wound to the right chest, lateral to the nipple. He is tachypnoeic (RR 30), SpO2 90 per cent on 15 L oxygen, BP 110/70; breath sounds are absent on the right and the trachea is central. Chest X-ray shows a large right pneumothorax with no haemothorax. The consultant asks you to insert a chest drain.
Clinical pearls
Key trials and evidence
3SITES trial — Central venous catheter insertion site (Parienti 2015, NEJM)
Study design
Multicentre randomised controlled trial — 3,027 patients needing a CVC for ≥3 days across 18 ICUs
Intervention
Subclavian vs jugular vs femoral site — randomly assigned
Primary outcome
Composite of catheter-related bloodstream infection AND symptomatic deep vein thrombosis: lowest with SUBCLAVIAN (subclavian 1.5%, jugular 3.3%, femoral 4.0%)
Mechanical risk
Symptomatic pneumothorax HIGHEST with SUBCLAVIAN (1.1%) vs jugular (0.3%) vs femoral (0%)
Clinical bottom line
Subclavian minimises infection/thrombosis but maximises pneumothorax; choose subclavian when infection risk and clean clotting dominate, IJV when ultrasound access and compressibility dominate, femoral for emergency/coagulopathic access
Pronovost / Keystone — Central line bundle (2006, NEJM)
Study design
Prospective cohort / quasi-experimental — 103 ICUs in Michigan, USA
Intervention
Five-component bundle: hand hygiene, maximal sterile barriers, chlorhexidine skin prep, avoid femoral site, daily review with prompt removal
Primary outcome
Median catheter-related bloodstream infection rate fell from 2.7 to 0 per 1,000 catheter-days (up to 66% reduction), sustained at 18 months
Clinical bottom line
A simple anatomically-grounded bundle (avoid the high-infection femoral site; use maximal sterile barriers at the chosen site) dramatically reduces CRBSI — the foundation of every ICU line protocol
Red flags
Cross-cutting principles — landmark, danger, safety rule
Every ICU procedure has the same three-part structure. Memorising it as a triplet makes any viva answer complete. [1]
Procedure anatomy — the landmark / danger / safety-rule triplet
| Procedure | Surface landmark | Deep target | Adjacent danger structures | Safety rule |
|---|---|---|---|---|
| Cricothyroidotomy | Laryngeal prominence (thyroid) → cricoid dip | Cricothyroid membrane | Cricothyroid artery (upper third); oesophagus (posterior); cricothyroid muscle (lateral); RLN (posterior) | Midline stab in lower third; angle caudally; confirm with capnography |
| Tracheostomy | Cricoid → sternal notch | 2nd–4th tracheal rings | Thyroid isthmus; brachiocephalic artery (low); cricoid/subglottic (high) | Below isthmus, above cricoid; never below the 4th ring |
| IJV CVC | SCM two-head apex (cricoid level) | Internal jugular vein | Carotid (medial/posterior); vagus; pleura; thoracic duct (left); phrenic | Ultrasound-guided; aim lateral to carotid; head-down |
| Radial arterial line | FCR tendon at wrist | Radial artery | Median nerve; ulnar supply (palmar arch) | Lateral to FCR; Allen test; 20 G |
| Chest drain | 5th ICS, anterior axillary line (SAFE triangle) | Pleural space | Intercostal VAN (below rib); long thoracic nerve; internal mammary; diaphragm/liver/spleen | Enter ABOVE the rib; ultrasound first; within SAFE triangle |
| Lumbar puncture | Tuffier's line (L4) → L3–L4 interspace | Subarachnoid space | Spinal cord (conus at L1–L2) if too high; epidural veins | Below L3; midline; flex patient; pop through ligamentum flavum |
| IO access | Tibial tuberosity (adult) | Marrow cavity | Growth plate (children); posterior tibial NVB (distal tibia) | 2–3 cm below tuberosity, anteromedial; avoid growth plate |
| Pericardiocentesis | Subxiphoid, left of xiphisternum | Pericardial sac/effusion | Right ventricle; internal mammary vessels; liver; pleura/lung | Aim at LEFT shoulder; echo-guided; aspirate as you advance |
Procedural ultrasound — the modern anatomical lens
Modern ICU procedures are increasingly performed under real-time ultrasound, which converts anatomical knowledge into direct visual guidance. The examiner expects you to know what ultrasound shows and how it changes the landmark-based approach.[1][1]
- CVC: a high-frequency linear probe in the transverse plane at the cricoid level shows the IJV as an oval, thin-walled, COMPRESSIBLE structure lateral to the round, thick-walled, NON-compressible, pulsatile carotid artery. Anisotropy (the IJV looks different at different insonation angles) and the Valsalva/Trendelenburg manoeuvres (which distend the vein) help confirm the venous identity. The needle is tracked in-plane (along the long axis of the probe) or out-of-plane; the wire is confirmed in both short- and long-axis views. NICE (TA49) and most guidelines now mandate ultrasound for elective CVC insertion.[1][1]
- Arterial line: ultrasound (transverse at the wrist) shows the radial artery as a small, round, pulsatile, NON-compressible structure lateral to the FCR tendon; useful in shocked/obese/oedematous patients where the pulse is impalpable.[1]
- Chest drain: ultrasound confirms the presence, depth, and loculation of pleural fluid; the lung point (in pneumothorax) and the diaphragm/liver (to avoid intra-abdominal misplacement) are identified BEFORE the incision.[1]
- Pericardiocentesis: echocardiography (subxiphoid or apical) confirms the effusion, its depth, and the needle-in-effusion in real time, dramatically reducing RV puncture.[1]
Sample exam question — worked answer
[1]Worked answer. The cricothyroid membrane (median cricothyroid ligament) is a flat fibroelastic sheet stretching in the midline between the thyroid cartilage above and the cricoid cartilage below. The thyroid cartilage is the largest laryngeal cartilage; its laryngeal prominence (Adam's apple) is the upper landmark, and its lower border forms the upper attachment of the membrane. The cricoid cartilage is the only complete ring of the airway — a signet-ring shape with a narrow anterior arch and a broad posterior lamina; it is the firm, palpable ring immediately below the thyroid and forms the lower attachment of the membrane. The membrane itself is the most superficial part of the airway, covered only by skin, subcutaneous fat, and the anterior jugular veins.[1]
A midline lower-third incision is preferred for four anatomical reasons. First, the membrane is midline, so a midline incision avoids the cricothyroid muscles, which lie laterally and run upwards and backwards from the cricoid to the inferior thyroid horn — a lateral incision would transect them and cause bleeding. Second, the cricothyroid artery (a branch of the superior thyroid artery) runs transversely across the UPPER third of the membrane and forms a small anastomotic arch in the midline — incising the LOWER third stays below these vessels. Third, the membrane is AVASCULAR in its lower third, minimising bleeding. Fourth, the membrane is below the vocal cords (which sit inside the thyroid cartilage at the cricothyroid joint), so a tube passed through it enters the subglottic airway, bypassing glottic obstruction.[1][1]
The structures at risk and how the technique avoids them: (a) the cricothyroid muscle (lateral) — avoided by a midline incision; (b) the cricothyroid artery (upper third) — avoided by incising the lower third; (c) the oesophagus (directly posterior to the cricoid and upper trachea) — avoided by angling the needle/tube caudally (along the tracheal long axis) rather than steeply backwards, and by confirming tracheal placement with a bougie (hold-up at the carina) and waveform capnography; (d) the recurrent laryngeal nerve (in the tracheo-oesophageal groove, posterior to the cricoid) — avoided by the same caudal angulation; (e) the posterior tracheal wall — avoided by a controlled incision that breaches only the anterior membrane, and by the bougie technique which rides along the anterior tracheal wall.[1][1]
The Difficult Airway Society 2015 standard technique — the scalpel–finger–bougie — operationalises this anatomy. The laryngeal handshake identifies the membrane; a transverse stab through skin AND membrane in the midline of the lower third opens the airway; the blade is turned 90° to open the stoma and the little finger hooks in to maintain the tract (the cardinal rule is never to lose the hole); a bougie is passed caudally down the trachea (hold-up at the carina confirms tracheal placement); and a cuffed 6.0 mm ETT is railroaded over the bougie. In children under 8–10 years the cricoid is the narrowest part of the airway and a surgical cricothyroidotomy is contraindicated — a needle cricothyroidotomy with jet ventilation is used instead, through the same membrane.[1][1]
Bottom line. The cricothyroid membrane is the emergency airway because it is midline, superficial, and avascular; a midline lower-third incision keeps the tract anterior (avoiding the oesophagus and RLN posteriorly), between the cricothyroid muscles (avoiding them laterally), and below the cricothyroid artery arch (avoiding it superiorly). The same landmark–danger–safety-rule triplet applies to every ICU procedure: the IJV (carotid medial/posterior), the chest drain (VAN below the rib), the lumbar puncture (conus above L3), the radial artery (ulnar collateral via the Allen test), and the pericardiocentesis (RV and internal mammary on the wrong trajectory).[1]
References
- [1]McGee DC, Gould MK The impact of nonsteroidal anti-inflammatory drugs on blood pressure, with an emphasis on newer agents Clin Ther, 2003.PMID 12637109
- [2]Pronovost P, Needham D, Berenholtz S, et al. Development of macular hole in the early postoperative period following pneumatic retinopexy Ophthalmic Surg Lasers Imaging, 2006.PMID 17152542
- [3]Parienti JJ, Mongardon N, Megarbane B, et al. (3SITES Study Group) Commentary on: Tissue engineering: How to build a heart Front Physiol, 2015.PMID 25852571